I am going to assume you have a way of installing it, either from a USB flash drive or an external CD/DVD drive, and are able to run Mint 7 live.
Mint 7 pretty much works out of the box on the 900, the wireless and webcam perform well and, with a little tweaking, it’s very snappy. More so than regular Ubuntu and some other Eee specific distros I’ve used.
I’ll be removing some stuff and adding bits, nothing heavy, just packages. I won’t be installing the Eee specific kernel nor will I be adding any of the scripts that are available. I want to keep this simple.
Sometimes, less is more…
So, let’s aume you’re running Mint as a live distro from USB. I’m running from SDHC and I have a UB stick inserted.
So, here’s the desktop:

To start the install, double click the Install icon on the desktop.
You will be greeted with the Install welcome screen:

Choose your language and hit the Forward button.
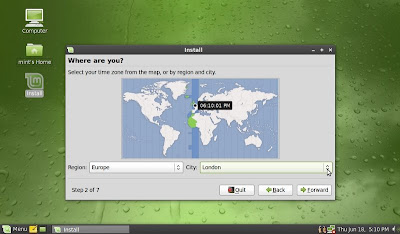
Next, select your region. I’m in London, as you can see. If you can point to where you are on a map, well done you!
For those who’s geography leaves something to be desired, choose from the drop down lists.

Now to choose your keyboard. If you’re not sure, accept the default. It should be correct. You can type stuff into the empty text box to check.

And now the best bit…
Partitioning.
This is the bit that throws many new users.
In this instance, we’re going to use the smaller 4gb drive for the operating system and the larger 16gb drive for our files.
Why?
‘Cos I said so.
I suppose I should point out that the following procedure will wipe both drives clean. So make sure you’ve backed up any files you need to a flash disk or whatever.
So, we want to set up our partitions manually because the installer doesn’t just do it for us.
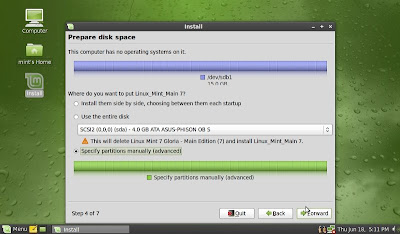
On the Prepare Disk Space page, we need to check the button titled “Specify Partitions Manually (Advanced)”, like this:

(Mine says something about deleting Linux Mint 7 Gloria because I have already installed it and am running the installer from a live disk to get the screenshots. You don’t have to worry about what it says there.)
***For those with the 16gb 900, which has a single disk, choose the “Use the entire disk” option and then accept whatever the install throws at you. You're next step will be User Details***
Click Forward.
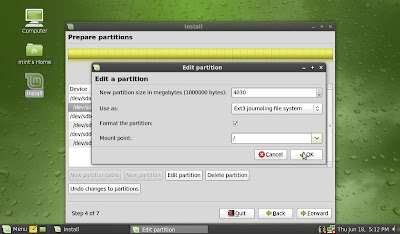
Now, highlight sda (the second line) and then hit Edit Partition and make it all look like this:

So, we are editing the 4gb drive which the operating system is going onto. We will use the Ext3 Journaling File System from the drop down list. We want to format the partition, so check the box and the mount point will be the / symbol from the drop down list.
Then click OK.
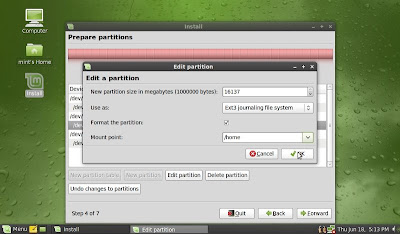
Now highlight sdb (the fourth line) and then hit Edit Partition and make it all look like this:

So, we are editing the 16gb drive which will store our files, documents, music etc. Again, we will use the Ext3 Journaling File System from the drop down list. We want to format the partition, so check the box and the mount point this time will be the /home option from the drop down list.
Then click OK.
Now hit Forward.
It’s at this point that I stopped getting screenshots. You will get a pop up message asking about a swap partition etc. We have 1gb of RAM in our machines and therefore we don’t need swap. So, just hit whatever you need to hit to make it go away.
Another screen will want your user details. Just enter your details and passwords here. Don’t hit any other buttons.
And then just hit OK or forward to get the install started.
The install itself doesn’t take long (if the screensaver kicks in, just move the cursor or hit the space bar).
When the install is finished, reboot.
Now, we are going to check that everything’s switched on so we don’t put up posts on forums because we believe our wireless isn’t working, making us look stupid.
When you boot, at the Asus screen hit F2 to bring up the BIOS.
Using the arrow keys, go right to highlight “Advanced”.
Then go down to highlight “Onboard Devices Configuration”.
Hit Enter.
Make sure that all the entries are enabled.
If one isn’t, go down to highlight it, hit enter, change it and hit enter.
Press Esc twice and then enter.
The machine will boot and in about 30-40 secs you will be greeted with the login page. Enter the username and password you provided earlier and in about 10 secs you will have your newly minted EeePC staring at you.
Joy!
Now, let’s tweak it a little…

No comments:
Post a Comment